React Native with Gitlab CI/CD
Introduction#
The aim of setting up CI/CD is to automatically build the app on every commit and send the APK. I looked into Gitlab CI/CD for this purpose since Sonzai is already hosted on Gitlab.
Build Stage#
To get started, I needed to choose a docker image in which the repo would be built. After looking around a bit, I found that the react-native-community has an official Docker image , the source of which can be found on GitHub .
Gitlab CI/CD is controlled by a versioned file in the repo: .gitlab-ci.yml.
To start off, I added the build job in the file and set image to the docker
image above.
stages:
    - build

build:
    image: reactnativecommunity/react-native-android
    stage: build
I needed to add the commands to be executed in order to build the app. Those
commands are added under the script key as an array. In my case, I need to
run yarn install to install all dependencies followed by ./gradlew assembleRelease in the android directory. The file now looks like.
stages:
    - build

build:
    image: reactnativecommunity/react-native-android
    stage: build
    script:
        - yarn install
        - cd android && chmod +x gradlew
        - ./gradlew assembleRelease
Next, once the build is done, I need to export the outputs generated in the
build to be consumed by the deploy stage. This is done by adding an artifacts
object which contains a path array for all the paths that need to be included
in the artifacts. In this case, the outputs are in
android/app/build/outputs/. The file now looks like:
stages:
    - build
    - deploy

build:
    image: reactnativecommunity/react-native-android
    stage: build
    script:
        - yarn install
        - cd android && chmod +x gradlew
        - ./gradlew assembleRelease
    artifacts:
        paths:
            - android/app/build/outputs/
The build stage is now done.
Deploy Stage#
Although I could use the same image, the image is fairly large and takes time
to initialize. So, I used
curlimages/curl
which is an alpine
image with curl added and thus is really light. I will be using curl to
upload the file to Telegram. Check out the
documentation
for bots API. Adding the deploy
stage, the file looks as:
stages:
    - build
    - deploy

build:
    image: reactnativecommunity/react-native-android
    stage: build
    script:
        - yarn install
        - cd android && chmod +x gradlew
        - ./gradlew assembleRelease
    artifacts:
        paths:
            - android/app/build/outputs/


deploy_tg:
    image: curlimages/curl
    stage: deploy
I created a bot via @BotFather
and added it to a
channel
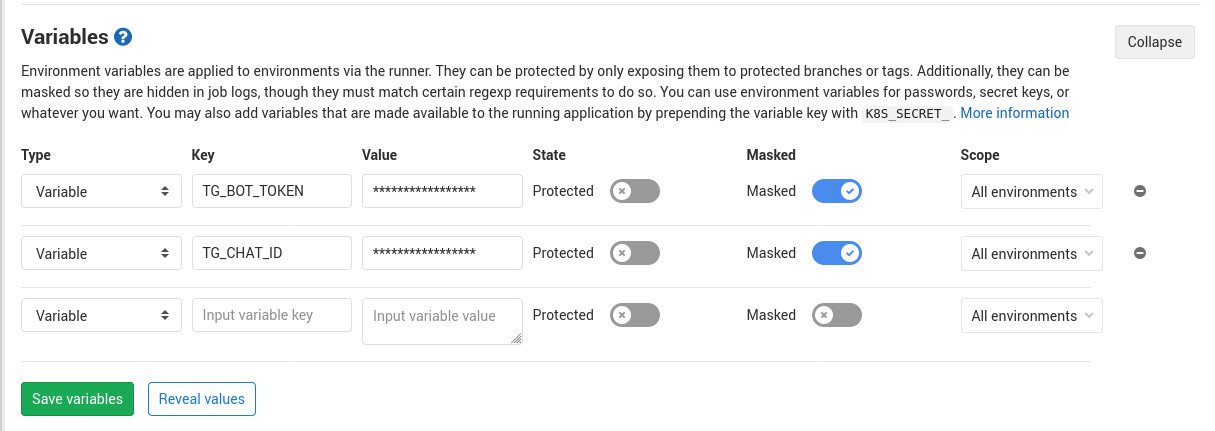
. Next, I got the channel’s chat ID. I
stored the Bot Token and the channel’s chat ID as variables in Gitlab’s UI
under Repository > Settings > CI / CD > Variables as TG_BOT_TOKEN and
TG_CHAT_ID respectively.
Next, I added a curl request in the script array to make the actual request to
Telegram Bot API which utilizes these variables. It also utilizes some
predefined variables in Gitlab’s default
environment
.
Here is the final .gitlab-ci.yml
stages:
    - build
    - deploy

build:
    image: reactnativecommunity/react-native-android
    stage: build
    script:
        - yarn install
        - cd android && chmod +x gradlew
        - ./gradlew assembleRelease
    artifacts:
        paths:
            - android/app/build/outputs/


deploy_tg:
    image: curlimages/curl
    stage: deploy
    script:
        - >-
            curl
            -F chat_id=$TG_CHAT_ID
            -F document=@android/app/build/outputs/apk/release/app-release.apk
            -F caption=" <b>Branch</b>: <code>$CI_COMMIT_BRANCH</code>

            <b>Commit</b>: <code>$CI_COMMIT_SHORT_SHA</code>

            <b>Tag(if any)</b>: <code>$CI_COMMIT_TAG</code>


            <code>$CI_COMMIT_MESSAGE</code>"
            -F parse_mode=html
            https://api.telegram.org/bot${TG_BOT_TOKEN}/sendDocument
Here is the first build using this.